Gazebo 仿真
Gazebo 是用于自主机器人的强大3D模拟环境,其特别适用于测试物体避障和计算机视觉。 本文描述了如何使用它来进行单机的软件在环仿真。 Gazebo 也可以适用于 硬件在环仿真 和 多机仿真 。
支持机型:四旋翼 (Iris 和 Solo),六旋翼(Typhoon H480),通用四旋翼构型 VTOL ,尾座式,固定翼,无人车,潜艇/无人水下航行器。
Gazebo 通常与 ROS 一起使用,ROS 可以理解成 Offboard 自动飞行控制的 API 工具包。 如果您计划同时使用ROS和PX4,则应遵循 ROS说明安装 去安装ROS和Gazebo(从而避免安装冲突)。

有关仿真器、仿真环境和仿真配置(以支持的机型为例)的基本信息,请参见 仿真 。
安装
Gazebo 9 的安装在标准的环境编译已有说明。
- macOS: Mac 上的开发环境。
Linux:Ubuntu LTS/Debian Linux 上安装 Gazebo、 JMAVSim 和 Nuttx(Pixhawk)的开发环境。</li>
Windows:暂不支持。</ul>
其他安装说明可在 gazebosim.org 上找到。
运行仿真
启动 PX4 SITL 和 Gazebo 进行仿真,并加载机架配置(支持多旋翼,固定翼,VTOL,光流和多机仿真)。
运行仿真最简单的方法是在 PX4 Firmware 存储库的根目录下打开一个终端,并调用
make编译所需目标。 例如,要开始一个四旋翼飞行器的仿真(默认):cd /path/to/Firmware make px4_sitl gazebo下文列出了支持的载具类型及对应的
make指令(点击链接查看载具图像)。使用指令
make px4_sitl list_vmd_make_targets获取构建目标的完整列表(并过滤掉以gazebo_开头的目标)。| 载具类型 | 指令 | | --------------------------------------------------------------------------------------------------- | -------------------------------------- | | 四旋翼 |
make px4_sitl gazebo| | 具有光流的四旋翼 |make px4_sitl gazebo_iris_opt_flow| | 3DR Solo(四旋翼) |make px4_sitl gazebo_solo| | Typhoon H480(六旋翼) (支持视频流) |make px4_sitl gazebo_typhoon_h480| | 标准构型的固定翼 |make px4_sitl gazebo_plane| | 标准垂起 |make px4_sitl gazebo_standard_vtol| | 尾座式垂起 |make px4_sitl gazebo_tailsitter| | Ackerman 地面车辆(UGV/Rover) |make px4_sitl gazebo_rover| | HippoCampus TUHH(UUV:无人水下航行器) |make px4_sitl gazebo_uuv_hippocampus| | 船(USV:无人驾驶水面艇) |make px4_sitl gazebo_boat|如果发生构建错误, 文件和代码安装指南 是一个有用的参考。
以上指令启动了一个具有完整 UI 的载具。 其他选项包括:
为了使 Gazebo 保持运行,请分别启动 PX4 和 Gazebo,并在需要时单独重新启动 PX4(比重新启动两者更快)。
在 无头模式 运行仿真将不会启动 Gazebo UI(使用的资源更少,速度更快)。
让飞行器起飞
上文的
make指令首先构建PX4,然后同时运行 PX4 与 Gazebo 仿真器。PX4运行后将启动如下所示的 PX4 shell 脚本。
| \ \ \ / / / | | |/ / \ V / / /| | | / / \ / /| | | | / /^\ \ __ | _| \/ \/ |_/
px4 starting.
INFO [px4] Calling startup script: /bin/sh etc/init.d-posix/rcS 0 INFO [param] selected parameter default file eeprom/parameters_10016 [param] Loaded: eeprom/parameters_10016 INFO [dataman] Unknown restart, data manager file './dataman' size is 11798680 bytes INFO [simulator] Waiting for simulator to connect on TCP port 4560 Gazebo multi-robot simulator, version 9.0.0 Copyright (C) 2012 Open Source Robotics Foundation. Released under the Apache 2 License. http://gazebosim.org ... INFO [ecl/EKF] 5188000: commencing GPS fusion
控制台将打印出“PX4”的形状,加载指定机型的初始化和参数文件,等待(并连接到)仿真器。 一旦 INFO 打印出的 [ecl/EKF] 状态为 `commencing GPS fusion` ,则表明该载具已准备就绪可以解锁。
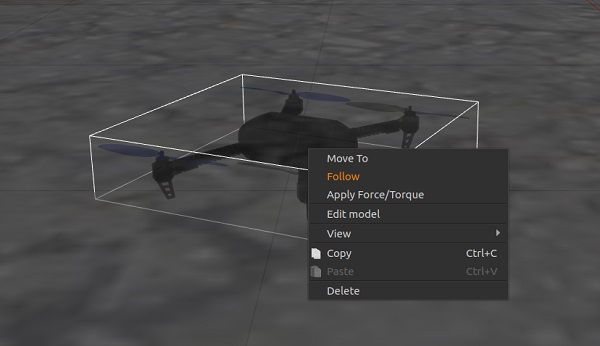
> **Note** 在 Gazebo 中右击四旋翼模型允许从上下文菜单启用跟随模式,这样可以方便地将其保持在视图中。
你可以通过输入以下指令让飞机起飞:
```sh
pxh> commander takeoff
```
## 使用/配置选项
### 无头模式 {#headless}
Gazebo 可以在 *无头(headless)* 模式下运行,在这种模式下 Gazebo UI 不会启动。 这会使 Gazebo 的启动速度更快并且使用更少的系统资源(即为一种更“轻量级”的运行仿真的方式)。
只需在 `make` 指令前添加 `HEADLESS=1`,如下所示:
```bash
HEADLESS=1 make px4_sitl gazebo_plane
```
### 设置自定义起飞位置 {#custom_takeoff_location}
The takeoff location in SITL Gazebo can be set using environment variables. This will override both the default takeoff location, and any value [set for the world](#set_world_location).
要设置的变量有:`PX4_HOME_LAT`、`PX4_HOME_LON` 和 `PX4_HOME_ALT`。
例如:
export PX4_HOME_LAT=28.452386
export PX4_HOME_LON=-13.867138
export PX4_HOME_ALT=28.5
make px4_sitl gazebo
### 更改仿真速率
可以通过设置环境变量 `PX4_SIM_SPEED_FACTOR` 来加快或减慢仿真环境相对于实际时间的流速。
export PX4_SIM_SPEED_FACTOR=2
make px4_sitl_default gazebo
更多相关信息请参考:[Simulation > Run Simulation Faster than Realtime](../simulation/README.md#simulation_speed).
### 使用操纵杆
通过 *QGroundControl* 可支持操纵杆或者拇指操纵杆([设置说明在此](../simulation/README.md#joystickgamepad-integration))。
### 提高距离传感器的性能
当前的默认世界是 [PX4/sitl_gazebo/worlds/**iris.world**](https://github.com/PX4/sitl_gazebo/tree/master/worlds), 它使用高度图作为地面。
这可能会在使用距离传感器时造成困难。 如果出现意外的结果,我们建议您将 **iris.model** 中的模型默认设定从 `uneven_ground` 改为 `asphalt_plane`。
### 模拟 GPS 噪声 {#gps_noise}
Gazebo 可以模拟类似于实际系统中常见的 GPS 噪声(否则报告的GPS值将是无噪声/完美的)。 这在处理可能受 GPS 噪声影响的应用(例如精度定位)时非常有用。
如果目标载具的 SDF 文件包含` gpsNoise `元素的值(值为 `<gpsNoise>true</gpsNoise>`),则GPS噪声将被模拟。 默认情况下, 它在许多载具的 SDF 文件中启用:**solo.sdf**、**iris.sdf**、**standard_vtol.sdf**、**delta_wing.sdf**、**plane.sdf**、**typhoon_h480** **tailsitter.sdf**。
启用/禁用GPS噪音:
1. 构建任何 gazebo 目标以生成 SDF 文件(适用于所有机型)。 例如: ```make px4_sitl gazebo_iris``` >**Tip** 在后续版本中不会覆盖 SDF 文件。
2. 打开目标载具的 SDF 文件(例如**./Tools/sitl_gazebo/models/iris/iris.sdf **)。
3. 搜索 `gpsNoise` 元素:
xml
<plugin name='gps_plugin' filename='libgazebo_gps_plugin.so'>
<robotNamespace/>
<gpsNoise>true</gpsNoise>
</plugin>
* 如果已预设,则启用 GPS。 您可以通过删除以下行来禁用它:`<gpsNoise> true </gpsNoise>`
* 如果未预设,则禁用 GPS 。 您可以通过将` gpsNoise `元素添加到` gps_plugin `部分来启用它(如上所示)。
下次构建/重新启动 Gazebo 时,将使用新的 GPS 噪声设置。
## 加载指定的世界 {#set_world}
PX4支持多个 [Gazebo Worlds](../simulation/gazebo_worlds.md) ,均存储在 [PX4/sitl_gazebo/worlds](https://github.com/PX4/sitl_gazebo/tree/master/worlds) 中。在默认情况下,Gazebo 显示的是一个平坦无特征的平面,如 [empty.world](https://github.com/PX4/sitl_gazebo/blob/master/worlds/empty.world) 中所定义。
You can load any of the worlds by specifying them as the final option in the PX4 configuration target.
For example, to load the *warehouse* world, you can append it as shown:
make px4_sitl_default gazebo_plane_cam__warehouse
> **Note** There are *two underscores* after the model (`plane_cam`) indicating that the default debugger is used (none). 详见 [Building the Code > PX4 Make Build Targets](../setup/building_px4.md#make_targets)。
You can also specify the full path to a world to load using the `PX4_SITL_WORLD` environment variable. This is useful if testing a new world that is not yet included with PX4.
> **Tip** If the loaded world does not align with the map, you may need to [set the world location](#set_world_location).
## Set World Location {#set_world_location}
The vehicle gets spawned into the origin of the world model at some simulated GPS location.
If using a world that recreates a real location (e.g. a particular airport) this can result in a very obvious mismatch between what is displayed in the simulated world, and what is shown on the ground station map. To overcome this problem you can set the location of the world origin to the GPS co-ordinates where it would be in "real life".
> **Note** You can also set a [Custom Takeoff Location](#custom_takeoff_location) that does the same thing. However adding the location to the map is easier (and can still be over-ridden by setting a custom location if needed).
The location of the world is defined in the **.world** file by specifying the location of the origin using the `spherical_coordinates` tag. The latitude, longitude, elevation must all be specified (for this to be a valid).
An example can be found in the [sonoma_raceway.world](https://github.com/PX4/sitl_gazebo/blob/master/worlds/sonoma_raceway.world):
<spherical_coordinates>
<surface_model>EARTH_WGS84</surface_model>
<latitude_deg>38.161479</latitude_deg>
<longitude_deg>-122.454630</longitude_deg>
<elevation>488.0</elevation>
</spherical_coordinates>
You can test this by spawning a rover in the [Sonoma Raceway World](../simulation/gazebo_worlds.md#sonoma-raceway) using the following `make` command (note that spawning takes longer the first time as the model needs to be downloaded from the model database):
make px4_sitl gazebo_rover__sonoma_raceway
The video below shows that the location of the environment is aligned with the gazebo world:
## Starting Gazebo and PX4 Separately {#start_px4_sim_separately}
For extended development sessions it might be more convenient to start Gazebo and PX4 separately or even from within an IDE.
In addition to the existing cmake targets that run `sitl_run.sh` with parameters for px4 to load the correct model it creates a launcher targets named `px4_<mode>` that is a thin wrapper around original sitl px4 app. This thin wrapper simply embeds app arguments like current working directories and the path to the model file.
To start Gazebo and PX4 separately:
* 通过在终端中指定环境变量 `_ide` 来运行 gazebo(或任何其他 sim 卡)服务器和客户端查看器:
sh
make px4_sitl gazebo___ide 或者
sh
make px4_sitl gazebo_iris_ide
* 在 IDE 中选择要调试的 `px4_<mode>` 目标(例如 `px4_iris` )。
* 直接从 IDE 启动调试会话。
This approach significantly reduces the debug cycle time because simulator (e.g. Gazebo) is always running in background and you only re-run the px4 process which is very light.
## Simulated Survey Camera
The *Gazebo* survey camera simulates a [MAVLink camera](https://mavlink.io/en/services/camera.html) that captures geotagged JPEG images and sends camera capture information to a connected ground station. The camera also supports video streaming. It can be used to test camera capture, in particular within survey missions.
The camera emits the [CAMERA_IMAGE_CAPTURED](https://mavlink.io/en/messages/common.html#CAMERA_IMAGE_CAPTURED) message every time an image is captured. The captured images are saved to: **Firmware/build/px4_sitle_default/tmp/frames/DSC_n_.jpg** (where *n* starts as 00000 and is iterated by one on each capture).
To simulate a plane with this camera:
make px4_sitl_default gazebo_plane_cam
> **Note** The camera also supports/responds to the following MAVLink commands: [MAV_CMD_REQUEST_CAMERA_CAPTURE_STATUS](https://mavlink.io/en/messages/common.html#MAV_CMD_REQUEST_CAMERA_CAPTURE_STATUS), [MAV_CMD_REQUEST_STORAGE_INFORMATION](https://mavlink.io/en/messages/common.html#MAV_CMD_REQUEST_STORAGE_INFORMATION), [MAV_CMD_REQUEST_CAMERA_SETTINGS](https://mavlink.io/en/messages/common.html#MAV_CMD_REQUEST_CAMERA_SETTINGS), [MAV_CMD_REQUEST_CAMERA_INFORMATION](https://mavlink.io/en/messages/common.html#MAV_CMD_REQUEST_CAMERA_INFORMATION), [MAV_CMD_RESET_CAMERA_SETTINGS](https://mavlink.io/en/messages/common.html#MAV_CMD_RESET_CAMERA_SETTINGS), [MAV_CMD_STORAGE_FORMAT](https://mavlink.io/en/messages/common.html#MAV_CMD_STORAGE_FORMAT), [MAV_CMD_SET_CAMERA_ZOOM](https://mavlink.io/en/messages/common.html#MAV_CMD_SET_CAMERA_ZOOM), [MAV_CMD_IMAGE_START_CAPTURE](https://mavlink.io/en/messages/common.html#MAV_CMD_IMAGE_START_CAPTURE), [MAV_CMD_IMAGE_STOP_CAPTURE](https://mavlink.io/en/messages/common.html#MAV_CMD_IMAGE_STOP_CAPTURE), [MAV_CMD_REQUEST_VIDEO_STREAM_INFORMATION](https://mavlink.io/en/messages/common.html#MAV_CMD_REQUEST_VIDEO_STREAM_INFORMATION), [MAV_CMD_REQUEST_VIDEO_STREAM_STATUS](https://mavlink.io/en/messages/common.html#MAV_CMD_REQUEST_VIDEO_STREAM_STATUS), [MAV_CMD_SET_CAMERA_MODE](https://mavlink.io/en/messages/common.html#MAV_CMD_SET_CAMERA_MODE).
> **Note** The simulated camera is implemented in [PX4/sitl_gazebo/src/gazebo_geotagged_images_plugin.cpp](https://github.com/PX4/sitl_gazebo/blob/master/src/gazebo_geotagged_images_plugin.cpp).
## Simulated Parachute/Flight Termination {#flight_termination}
*Gazebo* can be used to simulate deploying a [parachute](https://docs.px4.io/master/en/peripherals/parachute.html) during [Flight Termination](https://docs.px4.io/master/en/advanced_config/flight_termination.html) (flight termination is triggered by the PWM command that is simulated in *Gazebo*).
The `if750a` target has a parachute attached to the vehicle. To simulate the vehicle, run the following command:
make px4_sitl gazebo_if750a
To put the vehicle into flight termination state, you can force it to fail a [safety check](https://docs.px4.io/master/en/config/safety.html) that has flight termination set as the failsafe action. For example, you could do this by forcing a [Geofence violation](https://docs.px4.io/master/en/config/safety.html#geofence-failsafe).
For more information see:
* [飞行终止](https://docs.px4.io/master/en/advanced_config/flight_termination.html)
* [降落伞](https://docs.px4.io/master/en/peripherals/parachute.html)
* [ 安全配置(故障保护) ](https://docs.px4.io/master/en/config/safety.html)
## Video Streaming {#video}
PX4 SITL for Gazebo supports UDP video streaming from a Gazebo camera sensor attached to a vehicle model. When streaming is enabled, you can connect to this stream from *QGroundControl* (on UDP port 5600) and view video of the Gazebo environment from the simulated vehicle - just as you would from a real camera. The video is streamed using a *gstreamer* pipeline and can be enabled/disabled using a button in the Gazebo UI.
The Gazebo camera sensor is supported/enabled on the following frames:
* [Typhoon H480](#typhoon_h480)
### 必备组件
*Gstreamer 1.0* is required for video streaming. The required dependencies should already have been [installed when you set up Gazebo](#installation) (they are included in the standard PX4 installation scripts/instructions for macOS and Ubuntu Linux).
> **Note** FYI only, the dependencies include: `gstreamer1.0-plugins-base`, g`streamer1.0-plugins-good`, `gstreamer1.0-plugins-bad`, `gstreamer1.0-plugins-ugly`, `libgstreamer-plugins-base1.0-dev`.
### 启动/停止视频流
Video streaming is automatically started when supported by the target vehicle. For example, to start streaming video on the Typhoon H480:
make px4_sitl gazebo_typhoon_h480
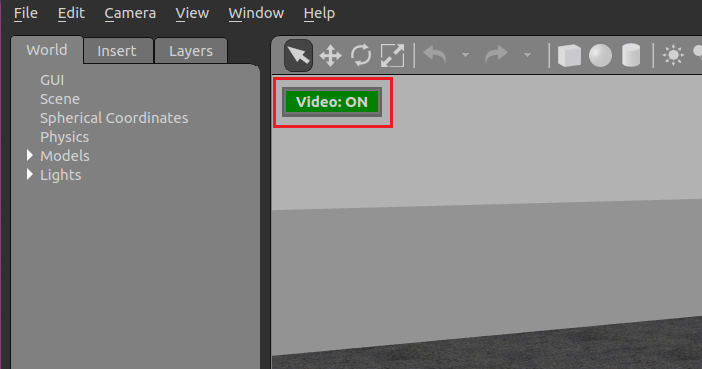
Streaming can be paused/restarted using the Gazebo UI *Video ON/OFF* button..
### 如何查看 Gazebo 视频
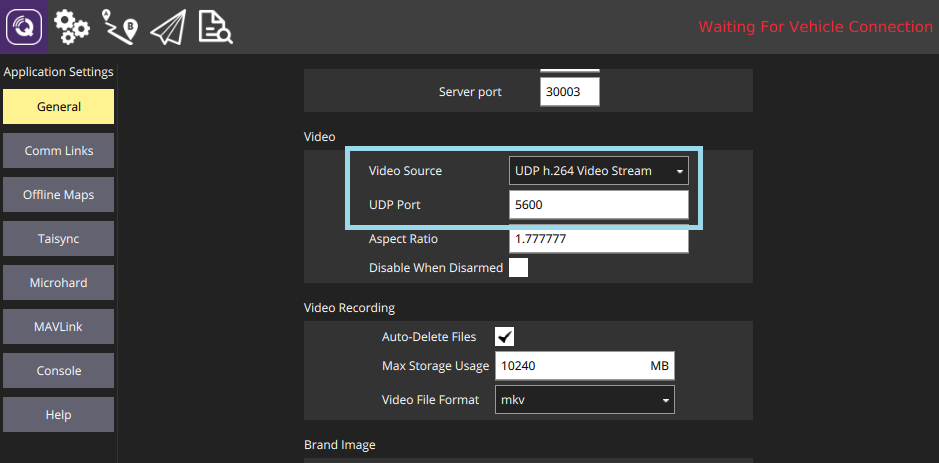
The easiest way to view the SITL/Gazebo camera video stream is in *QGroundControl*. Simply open **Application Settings > General** and set **Video Source** to *UDP h.264 Video Stream* and **UDP Port** to *5600*:
The video from Gazebo should then display in *QGroundControl* just as it would from a real camera.
> **Note** The Typhoon world is not very interesting.
It is also possible to view the video using the *Gstreamer Pipeline*. Simply enter the following terminal command:
```sh
gst-launch-1.0 -v udpsrc port=5600 caps='application/x-rtp, media=(string)video, clock-rate=(int)90000, encoding-name=(string)H264' \
! rtph264depay ! avdec_h264 ! videoconvert ! autovideosink fps-update-interval=1000 sync=false
```
## Extending and Customizing
To extend or customize the simulation interface, edit the files in the `Tools/sitl_gazebo` folder. The code is available on the [sitl_gazebo repository](https://github.com/px4/sitl_gazebo) on Github.
> **Note** The build system enforces the correct GIT submodules, including the simulator. It will not overwrite changes in files in the directory.
## Further Information
* [ROS 与 Gazebo 仿真](../simulation/ros_interface.md)
* [Gazebo Octomap](../simulation/gazebo_octomap.md)